
Ragazzi sapete chiarirmi un po i passaggi per il montaggio di un 3 pezzi Funn?
il sito del produtore
http://www.funnmtb.com/products/cranks.html
la spiega cosi:
1. Thread the right hand (drive side) cup into the frame and tighten down to 34-41 N*m (25 -30 ft-lb / 347-418 kg-cm) using a torque wrench.
2. place the large spacer sleeve inside the bottom bracket shell
3. Thread the left hand cup (the one with no shoulder) into the frame while checking that the spacer sleeve is aligned in the center and square to the bearings. Screw in the cup as far as you can with the center sleeve still being able to fall under its own weight ( do not tighten completely)
4. thread on the locking ring until tight , please note that if the locking ring will not screw completely onto the cup additional spacers may need to be added between the left hand cup and the larger spacer sleeve to increase the distance between the bearings thus leaving more cup thread sticking out of the frame for the lock ring to fit
5. select the correct size adapter for your chain ring and fit it on the axle on the right hand side of the axle
6. tighten down the lock ring then check that the spacer sleeve has not been clamped tight between the bearings and still falls under its own weight
7. align the chain ring bolt hole with the thread in the back of the arm , fit the blot supplied and tighten down
8. fit the silver spacer with recess in the back to the axle and slid up to meet the chain ring adapter
9. you will then need to fit enough of the smaller black spacers to ensure that the silver recessed spacer does not rub on the right cup , and also there must be enough spacers fitted to ensure that the chain ring does not hit the chain stay , ( you may need to fit axle into the bottom bracket cups a few times and adjust the number or thickness of the spacer in order to get the spacing correct
10. Fit enough of the smaller spacers to the left hand side so that when the wedge shaped silver spacer is fitted it does not rub on the left hand cup
11. Fit the left hand crank arm , if when tightened down the left arm hits the chain stay , add small spacers between the crank arm and the silver tapered spacer until the arm clears the chain stay
12. Fit the right hand crank arm to the axle and tighten down as far as it will go
13. Once tightened down cranks should run freely without any play.
14. The cranks should spin freely without the chain fitted, it the cranks are stiff or hard to turn by hand, please check that the left hand cup is adjusted so it is screwed in as far as it will go while still allowing the center spacer sleeve to fall under its own weight, also check that both of the silver aluminum spacers clear the cups and are not rubbing on the bottom bracket cups, if you still dont have it sorted take it all apart and start again.
ma in pratica non mi è ben chiaro come associare le definizioni in inglese con gli oggetti che ho nella scatola.
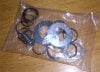
mi trovo con questi pezzi in mano (vedi allegato)
tks
il sito del produtore
http://www.funnmtb.com/products/cranks.html
la spiega cosi:
1. Thread the right hand (drive side) cup into the frame and tighten down to 34-41 N*m (25 -30 ft-lb / 347-418 kg-cm) using a torque wrench.
2. place the large spacer sleeve inside the bottom bracket shell
3. Thread the left hand cup (the one with no shoulder) into the frame while checking that the spacer sleeve is aligned in the center and square to the bearings. Screw in the cup as far as you can with the center sleeve still being able to fall under its own weight ( do not tighten completely)
4. thread on the locking ring until tight , please note that if the locking ring will not screw completely onto the cup additional spacers may need to be added between the left hand cup and the larger spacer sleeve to increase the distance between the bearings thus leaving more cup thread sticking out of the frame for the lock ring to fit
5. select the correct size adapter for your chain ring and fit it on the axle on the right hand side of the axle
6. tighten down the lock ring then check that the spacer sleeve has not been clamped tight between the bearings and still falls under its own weight
7. align the chain ring bolt hole with the thread in the back of the arm , fit the blot supplied and tighten down
8. fit the silver spacer with recess in the back to the axle and slid up to meet the chain ring adapter
9. you will then need to fit enough of the smaller black spacers to ensure that the silver recessed spacer does not rub on the right cup , and also there must be enough spacers fitted to ensure that the chain ring does not hit the chain stay , ( you may need to fit axle into the bottom bracket cups a few times and adjust the number or thickness of the spacer in order to get the spacing correct
10. Fit enough of the smaller spacers to the left hand side so that when the wedge shaped silver spacer is fitted it does not rub on the left hand cup
11. Fit the left hand crank arm , if when tightened down the left arm hits the chain stay , add small spacers between the crank arm and the silver tapered spacer until the arm clears the chain stay
12. Fit the right hand crank arm to the axle and tighten down as far as it will go
13. Once tightened down cranks should run freely without any play.
14. The cranks should spin freely without the chain fitted, it the cranks are stiff or hard to turn by hand, please check that the left hand cup is adjusted so it is screwed in as far as it will go while still allowing the center spacer sleeve to fall under its own weight, also check that both of the silver aluminum spacers clear the cups and are not rubbing on the bottom bracket cups, if you still dont have it sorted take it all apart and start again.
ma in pratica non mi è ben chiaro come associare le definizioni in inglese con gli oggetti che ho nella scatola.
mi trovo con questi pezzi in mano (vedi allegato)
tks